Evaluate to Meet the MLO (Model Lighting Ordinance)
In order to evaluate compliance with the MLO’s Performance Method we will need to make a few changes and additions to our project.
- The MLO demands that all calculations be done in terms of Initial Conditions, this means LLF=1. This is a little inconvenient as design calculations are seldom done in an initial conditions state, but it eliminates gamesmanship for results.
- We must add a series of vertical analysis planes surrounding the property line and an additional plane on top of the site. These calculations must extend to a distance of 10m (33’) above the highest luminaire. Fortunately, AGi32 allows us to do this without too much difficulty using the Obtrusive Light command.
- The MLO also requires global illumination in order to consider reflected light escaping the site. We have made these additions in the previous section with a reflective ground plane.
We can easily change the luminaire definitions to use a LLF=1 and then complete the MLO analysis.
- Return to Model mode if not already there.
- Open the Define dialog from the Luminaire Toolkit.
- Select Label A in the grid, then hold down the ctrl or shift key and select Label B. Both should be selected.
- Right-click to open the menu, select Change LLF.
- Enter1 in the dialog and click OK.
- Exit the Define dialog
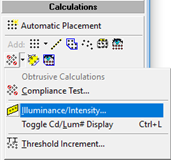
We are now ready to add the MLO analysis points using the Obtrusive Light command in AGi32.
|
|
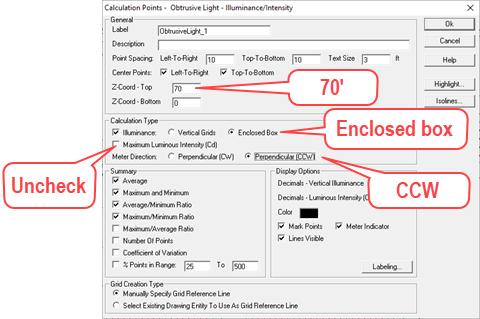
- Enter a Z-Coordinate Top of 70’. We must go to at least 63’ per MLO (33' above tallest pole). With points every 10’ and centered, our top row of points on the sides will be at 65’.
- Select Enclosed Box.
- Deselect Maximum Luminous Intensity checkbox (this is a glare indication and not used by the MLO).
- Select CCW meter (this can be changed on the fly so it’s not critical), we’ll draw in CCW direction.
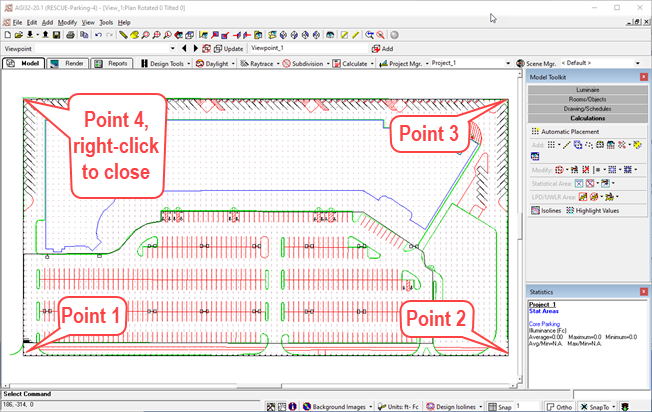
- Click OK and draw the polygon around the site on the property line, enable Snap-To (F3).
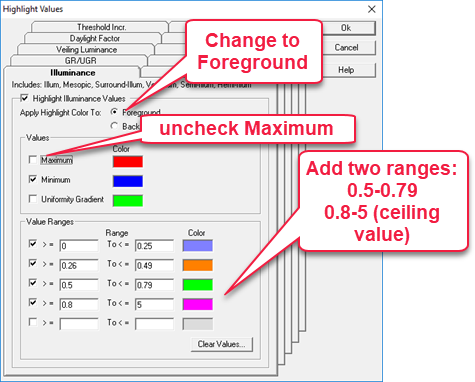
We need to make some changes to the Highlight Values ranges as we are adding a lot of additional calculation points and we want them to convey the proper information in render mode using Model Overlay.
- Select Highlight Values from the Calculations toolkit.
- Change to Foreground (easier to see).
- Remove checkmark for Maximum.
- Add two ranges: 0.5-0.79, 0.8-5 (ceiling value).
- Exit dialog.
Return to Render mode
- Click the Render tab.
- Click Calculate.
- Turn Off Model Overlay, this will allow us to navigate more easily.
- Orbit, then Walk to look at the west end of the lot as shown below.
- Turn Model Overlay back on.

The south side of the property is against the street and typically not of concern. But the west side is a problem. The MLO allows vertical illuminance at the property line up to 0.8 fc in Lighting Zone 3 and 1.5 fc in Lighting Zone 4.
AGi32 allows us to look at the entire MLO in terms of a compliance report.
- Return to Model mode (click tab)
- Click on the Obtrusive Light button (the compliance report is the default response).
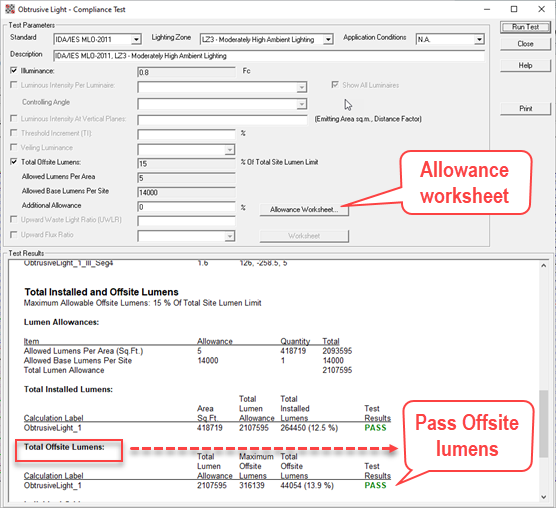
- Select “IDA/IES MLO-2011”
- Select Lighting Zone 3: LZ3 - Moderately High Ambient Lighting.
- Click the “Run Test” button
Scroll down to examine the report. The results are close for LZ3. One side of the property fails the vertical illuminance test. This is the west side as we already noticed.

Scroll down further and we can see we meet all of the offsite lumen allowances for LZ3. If we did not, we could use the “Allowance Worksheet” button to try and gain some lumen allowances.
Try changing the Lighting Zone to LZ4. Does our project still fail?
 RESCUE
Open the file: RESCUE-Parking-5.agi.

